Rendering
How can I use light linking with Yeti nodes?
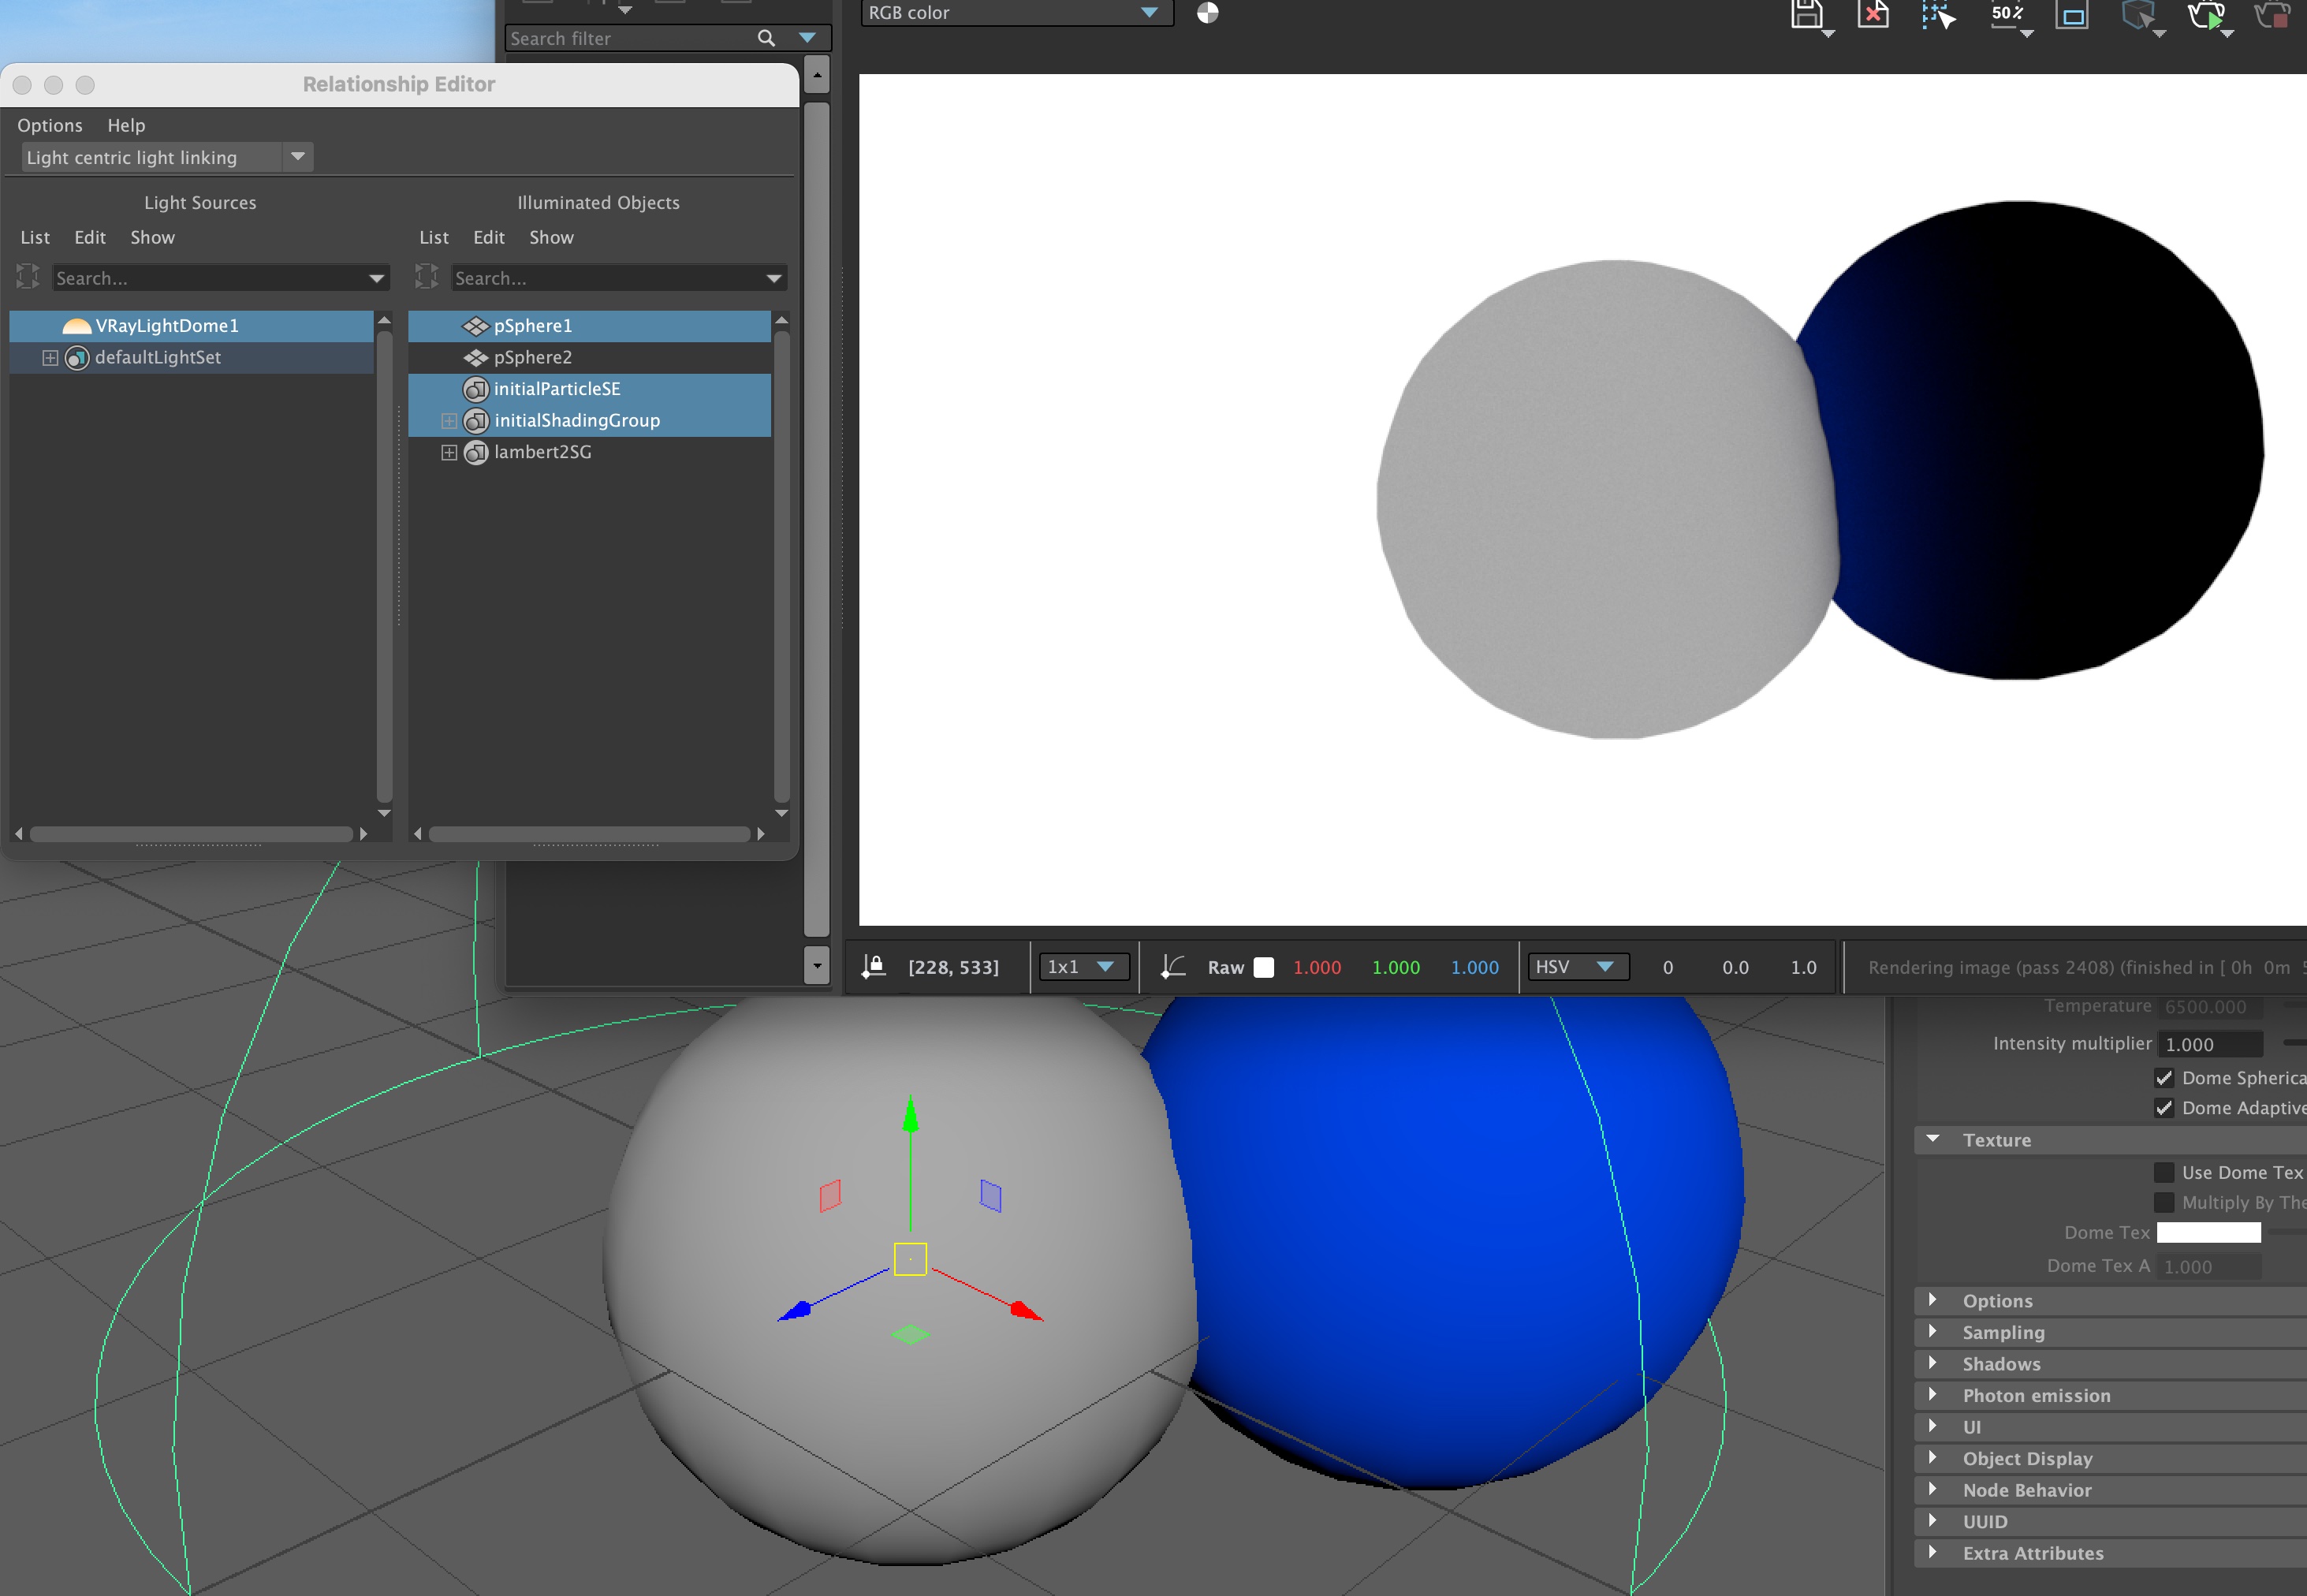
As each rendering extension handles exporting Yeti information to the rendering engine differently we recommend using Light Centric light linking to the shader associated with the Yeti node.
In this example image you can see that we've created a new Lambert shader which created the lambert2SG shading group (which is actually a set), then the VRayLightDome1 was unlinked from this shading group. In the render any objects (in this case the second sphere) aren't receiving any direct illumination (only indirect bounce) from the unlinked light.

Rendering with Autodesk's Arnold isn't working
If you are trying to render with Arnold the first step is ensuring you have a compatible version of both MtoA and Arnold.
Each release of Yeti is built against a specific version of MtoA and Arnold, you can check which version was used for the build in the release notes.
Once you have confirmed you are using compatible versions then you will need to check your environment variables.
Both MTOA_EXTENSIONS_PATH and ARNOLD_PLUGIN_PATH will need to be set as per the rendering extension configuration documentation.
You can confirm the value for both of these using the getenv command in Maya, for example:
getenv("MTOA_EXTENSIONS_PATH")
getenv("ARNOLD_PLUGIN_PATH")
This should match the values you have set for the environment variables which should be set to the plug-ins and bin directory as per the rendering extension configuration documentation.
Please note: we have found that more recent versions of MtoA may not pass the environment variables to it's spawned rendering process, you may need to set these variables at the System level vs. in a Maya.env to ensure it's set globally.
In the event that Yeti is complaining it isn't able to read/write the intermediate cache files please check that the directory exists and with the right access permissions.
Rendering with Chaos VRay isn't working
If you are trying to render with Chaos VRay the first step is ensuring you have a compatible version - each release of Yeti is built against a specific version of VRay, you can check which version was used for the build in the release notes.
Once you have confirmed you are using compatible versions then you will need to check your environment variables.
The variables VRAY_FOR_MAYAXXXX_PLUGINS, VRAY_FOR_MAYAXXXX_TRANSLATORS_PATH and VRAY_PLUGINS will need to be set as per the rendering extension configuration documentation - these can be set in your System Environment variables or via Maya.env.
Be sure to replace XXXX with the version of Maya you are using, so for Maya 2024 this would be:
VRAY_FOR_MAYA2024_PLUGINS += C:\Program Files\PeregrineLabs\Yeti-5.0.0_Maya2024\bin VRAY_PLUGINS += C:\Program Files\PeregrineLabs\Yeti-5.0.0_Maya2024\bin
VRAY_FOR_MAYA2024_TRANSLATORS_PATH += C:\Program Files\PeregrineLabs\Yeti-5.0.0_Maya2024\plug-ins
It is also recommended to add Yeti's bin directory to your systems PATH variable:
PATH += C:\Program Files\PeregrineLabs\Yeti-4.2.11_Maya2024\bin
You can confirm these are being passed into your working environment by using the getenv command in Maya, for example:
getenv("VRAY_FOR_MAYA2024_PLUGINS")
getenv("VRAY_FOR_MAYA2024_TRANSLATORS_PATH")
getenv("VRAY_PLUGINS")
The result of each command should reflect the values you've set.
In the event that Yeti is complaining it isn't able to read/write the intermediate cache files please check that the directory exists and with the right access permissions.
Is there a way to use masks to define areas where you want a different shader?
Most definitely, you can do this the same way other custom attributes are handled. A new attribute in the groom can be painted called "instanceshader" or similar, you can either paint this in the region of 0.0 - 1.0 ( the default ) or if you increase the max paint level you can paint from 0.0 - 10.0 ( or however many steps you want ).
Prior to the instance node you insert an attribute node an create a new attribute name instanceshader and make sure you're sampling the groom ( and have it connected to the second input ) and use the same attribute name as painted.
Then in the instance node in the Objects tab make sure that you add instanceshader to the list of Inherited Attributes. All of the instances will now have this new attribute also ( along with parent_id, parent_s and parent_t ).
These attributes are automatically "mapped", which means they will be exported to the renderer. Each renderer can access these differently.
For VRay it's the VRayUserScalar ( or Color ) - you put the name of the attribute in and the value will come out of the outAlpha attribute which can then be used with a switch node or similar to change shading properties.
For Arnold it's the AiUserFloat ( or Vector ) - which can be used with a switch etc.
For PRMan these will end up in the Rib stream as parameters to the shader, so if you are exporting instanceshader your surface shader should have
surface myShader( float instanceshader = 0.0 )
as a parameter and Yeti will declare these to be usable at shading time.