Caching
Caching will bake the groom data into externally written files for a specified time sequence.
Traditional fur systems store the entire dataset representing all the fibres that will be rendered, which can result in extremely large files.
Due to its procedural nature, Yeti cache files will only store the inputs required to regenerate the groom at render time or for viewport display.
This approach leads to smaller cache files, faster write times, and the ability to modify parameters without the need to re-cache.
Cache File Format
Yeti's cache file format is built on top HDF5 which is extremely extensible.
Every cache file represents a Yeti graph with global variables, input objects, grooms and guides with relevant dynamic and static attributes.
It's possible to inspect the data stored in a Yeti cache using HDFView.
Cache Previews
If desired, Yeti can store the current viewport evaluation as a preview in the cache. This preview allows artists to get faster viewport feedback when referencing the cache during lighting.
This feature can be toggled on or off in the Yeti node's I/O options.
The current density value for the graph is also stored with the preview. If, when viewing the cache, the density is lower than the stored value the fur will be culled; if higher the density value stored within the cache will be drawn.
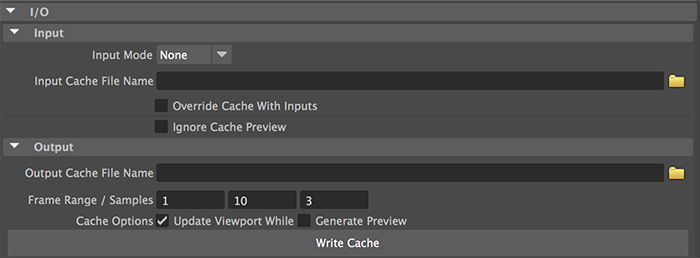
Caching a Yeti Graph via the UI
If you would like to cache a graph using the UI select the Yeti node you would like to cache and open the I/O palette in the Attribute Editor.
Here you can define the frame range and number of steps to use.
If you would like to see the viewport update while caching you can toggle this on, but it tends to slow down the process.
When you are ready you can use the Write Cache button to start the process.
Caching a Yeti Graph via Scripting
Caching via scripting is the recommended method for anything more than just simple workflows as it provides much more flexibility.
The pgYetiCommand is used to cache via the command line, the simplest use case is to specify the filename, frame range and the desired Yeti node.
pgYetiCommand -writeCache <filename> -range <startframe> <endframe> <nodename>
the command will use standard C syntax for resolving the frame number - eg. %04d for 4 padding, so for example, if I wanted to cache 20 frames of my furry monster I would use:
pgYetiCommand -writeCache “/myCacheDir/furryMonster.%04d.fur” -range 1 20 myFurryMonsterYetiShape
once executed you will see your scene step through the time line and cache the results to individual files.
Please reference the cache scripting reference for all of the available parameters.
Concurrent Caching
If multiple Yeti node names are passed for caching they will all be cached concurrently, to allow Yeti to save the cache data to node specific files the <NAME> tag can be used. For example:
pgYetiCommand -writeCache “/myCacheDir/furryMonster_<NAME>.%04d.fur” -range 1 20 furryMonsterShape
will output cache files named furryMonster_furryMosterShape.0001.fur, furryMonster_furryMosterShape.0002.fur and so on.
pgYetiCommand -writeCache “/myCacheDir/furryMonster_<NAME>.%04d.fur” -range 1 20 furryMonsterShape evenFurrierMonsterShape
will output cache files named furryMonster_furryMosterShape.0001.fur, furryMonster_evenFurrierMonsterShape.0001.fur, furryMonster_furryMosterShape.0002.fur, furryMonster_evenFurrierMonsterShape.0002.fur and so on.
Additionally, multiple file names and directories may be specified separated by the pipe symbol which allows more explicit naming.
For example:
pgYetiCommand -writeCache “/myCacheDir/furryMonster_<NAME>.%04d.fur|/aDifferentCacheDir/evenFurrierMonsterShape_<NAME>.%04d.fur” -range 1 20 furryMonsterShape evenFurrierMonsterShape
will output the first node to /myCacheDir and the second to /aDifferentCacheDir with their respective names.
If providing multiple cache names you will need as many names as there are nodes to be cached.
Viewport Update
By default Yeti will update the current 3d viewport while caching so you can preview the results as it goes - as displaying the fur as it caches means the graph will need to evaluate you may want to turn this off in some cases to speed up the process.
If caching via the UI there is a toggle used to control this behavior.
On the command line the -updateViewport true/false parameter can be used.
The command line export will not obey the UI toggle so you will have to explicitly control this from the command line.
Sample Count
By default, Yeti will cache out three samples for every frame. For instance, for frame 1, it will cache 0.5, 1.0, and 1.5. For frame 2, it will cache 1.5, 2.0, and 2.5. The cache can be referenced at any time, but it will be clamped outside the time samples. If a time is requested that doesn't correspond directly to a sample, Yeti will interpolate accordingly.
In certain cases, when a character's motion is extremely rapid, the scene needs to be sampled at a higher rate to capture the shape changes more accurately.
This is achieved with the -samples <int numberOfSamples> parameter.
For instance, if you wanted to cache the previous example with 5 samples compared to 3, you would do this:
pgYetiCommand -writeCache “/myCacheDir/furryMonster.%04d.fur” -range 1 20 -samples 5
and now frame 1 will be stored as 0.5, 0.75, 1.0, 1.25, 1.5 as you would expect.
Alternatively you can specify explicit samples using the -sampleTimes <string sampleTimes> parameter, allowing a space separated list of frame aligned sample times.
For example:
pgYetiCommand -writeCache “/myCacheDir/furryMonster.%04d.fur” -range 1 20 -sampleTimes "-0.3 -0.15 0.0 0.15 0.3"
Will now store frame 1 sample times at 0.7, 0.85, 1.0, 1.15, 1.3.
Please refer to the scripting documentation for more details.
Displaying a Yeti Cache
Once a groom has been cached to disk, it can be referenced for display and rendering purposes.
To do this, create a new Yeti node (press CR in the Yeti shelf) and set the Cache Filename parameter to the full path of the cache files. For example:
/myCacheDir/furryMonster.%04d.fur
Then set the file mode to Cache which will cause the node to evaluate and display the result in the viewport.
When referencing a cache Yeti will only use a Render license.
If at some point a corrective groom, new guide set or input geometry is added to the Yeti node this will cause a license to be checked out - prior to reading a cache make sure the node isn't being fed new data to avoid unexpected licenses being checked out.
Rendering a Yeti Cache
There's no difference between rendering a live groom and a cache file. The result should look the same. Instead of exporting a temporary cache file for rendering, the on-disk cache will be referenced directly.