Groom Node
The Groom node holds a groom's strands and painted attributes. Its attributes, in Maya's Attribute Editor, control how new strands are created, how the groom is displayed, and how it's layered and simulated. Click Edit Groom at the top of its Attribute Editor to start the Grooming context and edit the groom with brushes.
Groom
| Attribute | Description |
|---|---|
| Radius Of Influence | How far each strand's influence reaches. When the graph uses the groom, each fibre follows the strands near it. At 0, the default, there's no limit, so every fibre follows its nearest strands however far away they are. Set a distance to ignore strands further away than that, for example so that strands on one part of a character don't affect sparse fur elsewhere. |
Strands
These settings control the strands you add with the Grooming context's populating tools.
| Attribute | Description |
|---|---|
| Segment Creation Type | How many segments new strands have: By Length sets the length of each segment (so longer strands get more segments), and By Count gives every strand the same number. More segments let strands bend more smoothly. This also controls how strands are resampled. |
| Segment Length | With By Length, the length of each segment. Each segment is this length or shorter, depending on the strand's length. |
| Segment Count | With By Count, the number of segments in each strand. |
| Strand Length | The length of new strands. Set it to 0 to create points with no length, for a groom that you only use to paint attributes, such as density. |
| Conform New Strands | When on, new strands take their length, density and shape from the strands around them, so they blend in with their neighbours. When off, they use the settings above. |
| Create at Mesh Vertices | When on, new strands are created at the vertices of the input mesh. When off, you can create strands anywhere on the mesh. |
| Minimum Strand Distance | The minimum distance Yeti keeps between strands when you add or move them. |
| Minimum Strand Length | The shortest length a new strand can have. |
Resampling
Resamples all of the strands, or only the selected ones, using the Segment Creation Type and the segment length or count above.
| Attribute | Description |
|---|---|
| Min Segments | The minimum number of segments a strand can have after resampling. |
| Max Segments | The maximum number of segments a strand can have after resampling. |
| Resample | Resamples the selected strands, or every strand if none are selected. |
Component Editing
Settings for editing strands in Component Editing mode.
| Attribute | Description |
|---|---|
| Display Style | Whether to show All of each strand's points, or only its End Points. |
| Maintain Length | When on, strands keep their length while you edit their end points. |
Parting
These settings control the parts in the groom. See Parting Regions below for how to create them.
| Attribute | Description |
|---|---|
| Parting Randomness | How random the edges of the parting regions are, for the whole groom. |
| Auto Parting | Turns automatic parting on or off. |
| Auto Parting Threshold | The angle threshold that automatic parting uses to decide where to create a part. |
| Auto Parting Reference Position | The position along the strands, from 0 at the root to 1 at the tip, where the angle is measured for automatic parting. |
Parting Regions
Many hairstyles have a part, where the hair is combed in opposite directions. You can groom strands in opposite directions, but by default each fibre blends the strands around it, so the fibres along the part fan out across it instead of making a clean line.
For a clean part, paint parting regions:
- In the Groom node's Attribute Paint section, add an attribute for each side of the part, with a name that starts with
part_, such aspart_leftandpart_right. - Paint each one as a mask, with a value of 1 over the area its side covers and 0 elsewhere.
Fibres in one region then only follow strands in the same region, so the hair on either side of the part stays separate. Where regions overlap, the strands' effect is weighted by the values of the masks.
To keep the part from looking too even, paint an attribute called part_randomness to vary how ragged its edge is, or set Parting Randomness for the whole groom.
For an example, open yeti_partingExample.ma from the examples folder of your Yeti installation.
Deformation Layers
Deformation Layers let you layer other grooms and guide curves on top of a groom, to reshape its strands, much like adjustment layers in a paint program. For example, you can keep a base groom and layer a second groom with a different style on top, then blend between them with the layer's weight. Because the base groom isn't changed, you can always go back to it.
A layer only needs to be on the same mesh as the groom. It can have a different number of strands, different lengths and so on.
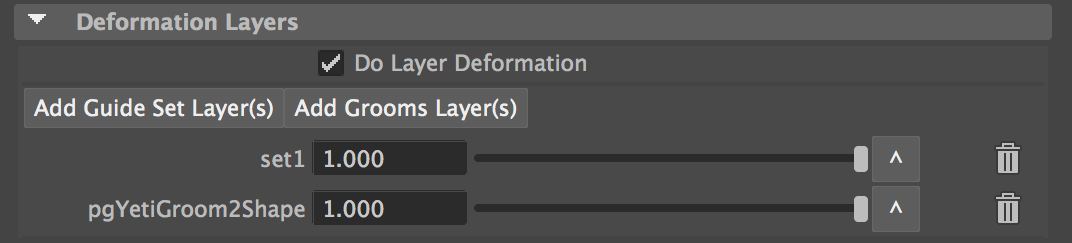
| Attribute | Description |
|---|---|
| Do Layer Deformation | Turns layer deformation on or off. |
| Add Guide Set Layer(s) | Adds one or more guide sets as new deformation layers. |
| Add Grooms Layer(s) | Adds one or more grooms as new deformation layers. |
Each layer has its own row, where you can set its weight with the field or slider, raise it in the stack, or remove it. To limit a layer to part of the groom, paint a layer mask on the layer's groom.
Attribute Paint
Settings for displaying and managing the groom's paintable attributes. To paint them, use the attribute painting tools in the Grooming context.
| Attribute | Description |
|---|---|
| Display | Shows the values of the current attribute in the viewport. |
| Display As Heat Map | Colours the values as a heat map instead of in greyscale. |
| Display Size | The size of the value display in the viewport. |
| Min Clipping Level | The value that's displayed as black (0.0) in the viewport. |
| Max Clipping Level | The value that's displayed as white (1.0) in the viewport. |
| Randomize Seed | The random seed that the Randomize tool uses. |
| Attribute List | The groom's paintable attributes. Select one to make it the current attribute. Use Add, Duplicate, Rename and Remove to manage them. |
| Add Layer Mask | Adds a layer_mask attribute to the groom. When the groom is used as a deformation layer, paint this attribute to control how strongly the layer affects each strand, from 0 (no effect) to 1 (full effect). |
Texture Utilities
You can export the current attribute to a texture map, using the input mesh's current UVs, or import a texture to set the values of the current attribute.
| Attribute | Description |
|---|---|
| Resolution | The width and height of the exported texture, in pixels. |
| Value Range | The attribute values that map to black and white in the exported texture. |
| U Range / V Range | The range of UVs to export. |
| Export | Exports the current attribute to a texture. |
| Import | Sets the current attribute's values from a texture. |
| Export Direction | Exports the direction of the strands to a texture. |
Display

| Attribute | Description |
|---|---|
| Display Strands | Shows or hides the strands. |
| Display Strand Segments | Draws each strand's segments in the viewport. |
| Isolate Selected Strands | When some strands are selected, draws only those strands in the viewport. |
| Display Strand Length | Shows the length of each strand at its tip (only the selected strands when Isolate Selected Strands is on). |
| Color | The colour of the strands. |
| Display Transparency | The transparency of the strands. |
| Display Width | The width of the strands. |
Simulation and Corrective Groom
The Simulation and Corrective Groom sections are described in Simulation.